- Mezzanine Floors
- Self-Storage Units
- Racking & Shelving
- Custom Fabrications
The Guide to Warehouse Racking Projects
read
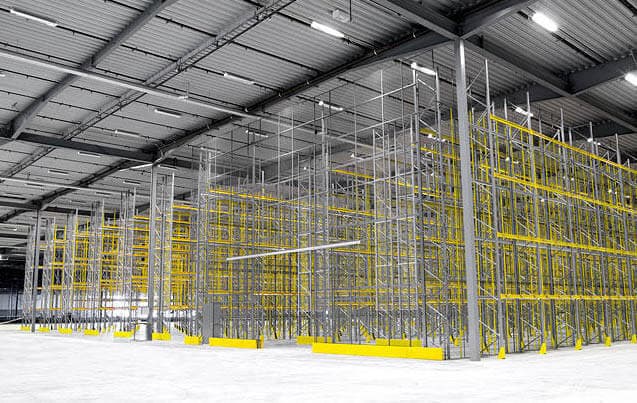
The warehouse is a dynamic environment, a central nervous system for supply chains across industries, where the racking system is far more than just a structure for storage. It is a meticulously engineered framework crucial for operational efficiency, safety, and profitability.
To maintain a competitive edge and ensure the longevity and adaptability of its storage infrastructure, a business should continually review and optimise the design and layout of its warehouse racking.
This comprehensive guide delves into best practices and key considerations for effective warehouse racking, drawing on our extensive experience in the field.
Strategic Design: The Foundation of an Optimised Warehouse
The journey to an optimised warehouse begins with strategic design. This critical initial phase involves far more than simply placing shelves; it demands a deep understanding of a business's unique operational needs, inventory characteristics, and future growth projections.

The primary objectives of careful racking design are to maximise storage density, improve the physical flow of inventory, and enhance operational efficiency. Achieving these goals requires thoughtful system selection and a layout that not only accommodates current demands but also provides an adequate safety profile, meeting all relevant industry standards, such as those set by the Storage Equipment Manufacturers' Association (SEMA).
In this article, we’ll discuss how you can ensure the design objectives for your warehouse racking can be met, from the choice of racking to basic principles of optimisation, whether your project is large or small. Because pallet racking and longspan racking offer a wide and varied range of storage options, we’ve elected to discuss these two types of racking to illustrate our advice.
Racking System Fundamentals
The world of warehouse racking is incredibly diverse, offering specialised solutions tailored to virtually every conceivable storage challenge. Racking systems vary widely in height, width, depth, and especially in their weight loading capacity. However, while diverse, racking systems do share some common terminology.
A frame is the upright section, made of two vertical supports connected by diagonal and horizontal braces. Beams are the horizontal, load-bearing structures that join two frames, creating a 'beam level' where products or pallets are placed. A bay consists of two frames and the beams connecting them, forming a single storage unit. A run is a continuous row created by joining multiple bays together.
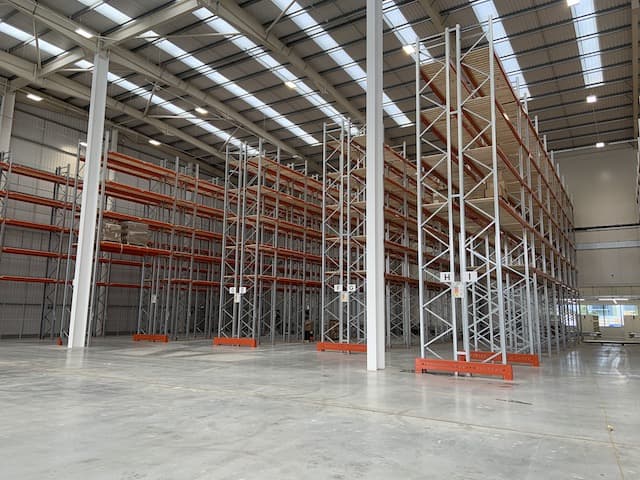
Pallet Racking - The Storage Backbone
For many operations, pallet racking systems form the backbone of storage, designed primarily for loading and unloading using specialised lifting equipment, most commonly forklift trucks. Modern pallet racking often boasts modularity, providing the flexibility to modify the system as business requirements evolve, ensuring the initial investment is protected.
Among pallet racking solutions, selective pallet racking is the most common, as it is well-suited for warehouses employing a first-in, first-out (FIFO) inventory rotation method. Typically one pallet deep, it offers high accessibility to individual items but lower storage density, requiring a typical aisle space of 3.5 metres for reach trucks and 4.5 metres for counterbalanced forklifts, depending on the type of forklift.
To optimise space, narrow aisle racking utilises specialist forklift trucks with wire guidance systems, allowing for significantly reduced aisle widths. Similarly, high bay racking requires specialised forklift trucks or stacker cranes to access items stored at elevated heights, maximising vertical space.
Double-reach racking stores pallets two rows deep, substantially reducing the number of aisles when configured back-to-back. For "first in, last out" (FILO) or "first in, first out" (FIFO) stock rotation, drive-in or drive-through racking allows pallets to be stored on rails, optimising space with a drive-through offering enhanced accessibility.
Push-back racking uses mobile carts that slide back as pallets are loaded, making it ideal for consistent products where space is at a premium.
For specific environments or durability needs, galvanised racking stands out as a heavy-duty solution for outdoor storage, thanks to its corrosion-resistant galvanised steel construction, which can withstand adverse weather conditions. When easy access and frequent stock rotation are paramount, wide aisle racking is compatible with counterbalance or reach forklift trucks. Kimer pallet racking is an example of a very robust system, and we’ve successfully installed it in several large-scale projects involving many high frames.
Other, more specialised racking options are also available for uniquely shaped and weighted items:
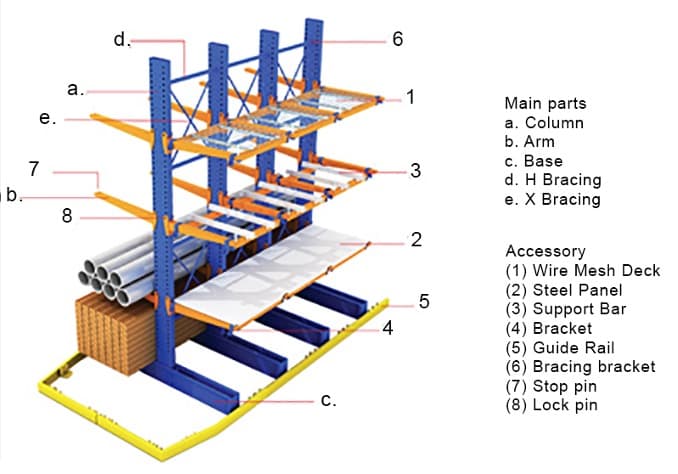
- Cantilever racking is designed to support bulky, long items like pipes or rolls of carpet, configurable as either single or double-sided, often supporting 1000kg UDL per arm.
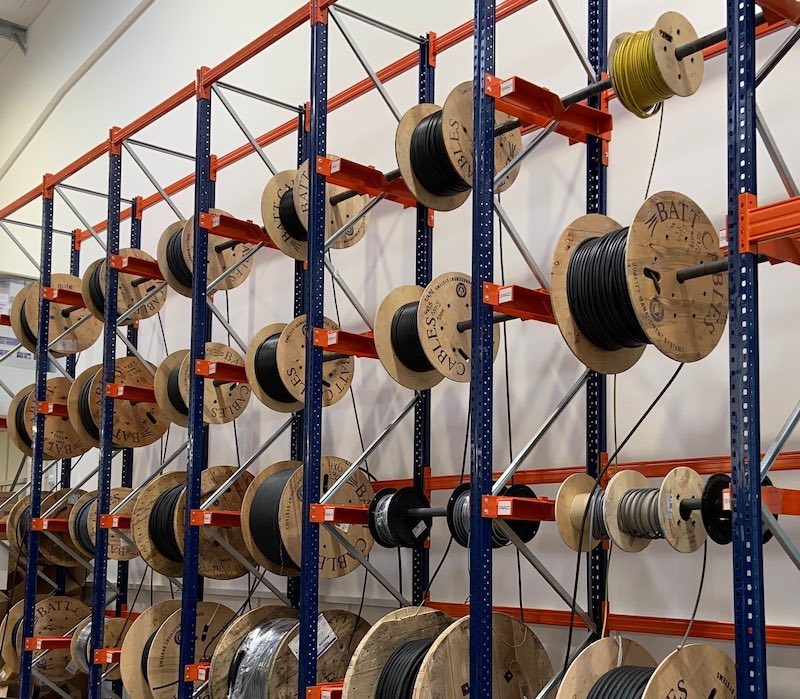
- Coil racking and cable racking are engineered for storing heavy drums of cable or smaller material coils, allowing for cutting or hand loading.
- Tyre racking, manufactured from steel using customisable long span racking principles, is designed to accommodate specific tyre dimensions and widths, and can be custom-finished to align with company branding.
Longspan Racking - The Storage Workhorse
Beyond pallet-based systems, longspan shelving systems are a highly versatile "workhorse" of industrial and commercial racking, often considered the "swiss army knife" for various storage needs. They allow for stowing everything from small cartons to unsecured items, stacks of folded apparel, or lengths of plastic pipe.
Its accessible, adaptable design makes it ideal for retail environments or warehouses focused on manual order picking, allowing pickers to easily locate, load, and retrieve light or medium inventory by hand, eliminating much of the stretching and bending common in manual operations. While perhaps not as durable as conventional pallet racking, which we discussed earlier, longspan shelving is a popular choice due to its sturdy construction, which allows it to hold heavier loads - up to 500kg Uniformly Distributed Load (UDL) - per pair of beams.
It is important to note that longspan racking is not suitable for use with forklift trucks due to the risk of impact damage. However, that aside, longspan racking is space-efficient, modular, and light enough to be moved by hand, supporting flexible storage environments that can adapt to changes in inventory or storage management processes. Its flexible nature makes it an ideal candidate for custom shelving designs that maximise both vertical and horizontal storage space, allowing for logical inventory placement and avoiding overcrowding.
Racking systems come in various widths, heights, and depths, lending themselves to custom uses and configurations for specific processes. They can also be integrated with pre-existing warehouse racking.
Designing for Optimal Layout and Efficiency - Getting The Balance Right
Whatever racking solution you opt for, effective storage planning requires a holistic approach that considers the type, size, and layout of the racking system in conjunction with a precise understanding of how items move within and out of the warehouse.
The seemingly simple goal is to design a space that maximises utilisation of floor space while streamlining product movement. Therefore, initial floor plans must account for all areas, including office space, goods receiving zones, sorting areas, packing stations, and shipping points.
A crucial aspect of design involves balancing trade-offs and constraints. It’s important that the design process includes zone and flow configurations that prioritise staff safety and ease of use, while incorporating the best options for pallet or inventory flow systems. For instance, reducing aisle widths can significantly increase storage space; however, there are potential drawbacks, such as restricted access for equipment or slower picking times. For example, when weighing maximum storage capacity against possible bottlenecks, the pick face created by a potential racking system, the depth of bays, and how the storage system impacts inventory flow must be considered.
Given the complexity of many warehouse operations, finding racking specialists with extensive experience ensures you obtain the optimal layout and configurations that your warehouse can support.
An effective design process can only be refined over decades of experience; we should know, having completed many such design projects over 5 decades, and counting.
So, when it comes to racking design, what are you looking for?
Well, a good design partner should typically follow a structured approach that at the very least covers the following stages:
1. Requirements Gathering: Specialists collaborate with the client team to define the ideal racking system, discussing inventory type and volume, warehouse size and layout, existing stock management processes, desired functionality, and any current bottlenecks or inefficiencies.
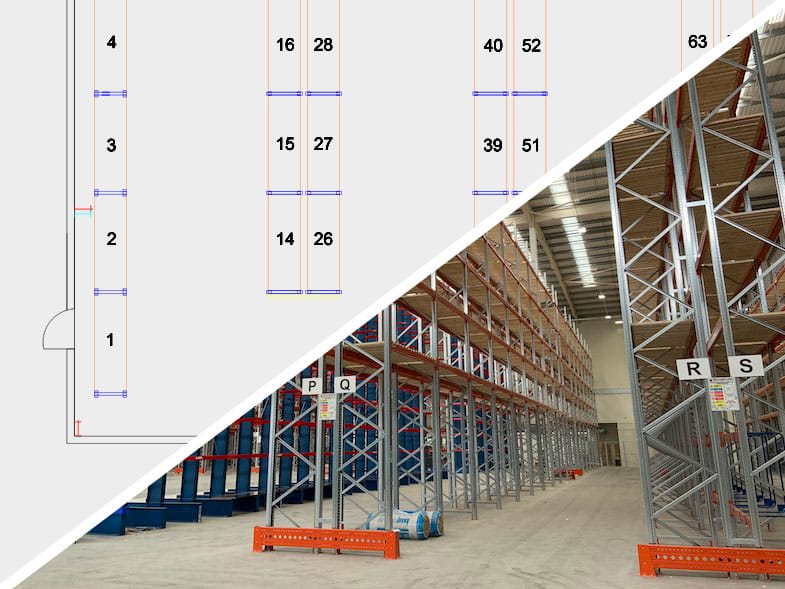
2. The Design Process: Leveraging gathered requirements, a dedicated design team utilises advanced tools such as CAD (Computer-Aided Design) and 3D modeling software to develop the optimal layout, considering racking type, bay sizes, zone layouts, shelf heights, picking surfaces, and safety features like barriers, wire mesh, and floor bolts.
3. Commercial Sign Off: Initial designs are presented for client review, including detailed schematics and an itemised list of components, with thorough explanations of design rationale.
4. Installation (often integrated): While this can be provided as an optional service, design and installation are often combined for most clients because, in our experience, this offers the best outcome. Well-qualified installers ensure efficient handling of complex installations across various challenging environments.
5. Racking Inspections: Post-installation, a regular regime of comprehensive racking inspection services will ensure ongoing SEMA compliance and staff safety. Your racking inspection partner should offer hands-on advice regarding health and safety assessments and other regulatory aspects, in addition to the physical inspection.
Racking Dimensions and Capacities
While we’re discussing design, the physical dimensions and load-bearing capacities of racking systems are critical design parameters - and for good reason. If you get this wrong, your operation can suffer, and personnel safety is at risk. Getting it right, from the outset, makes sense.
Standard frames are often available in heights of 3.0, 4.0, 5.0, and 6.0 metres, with depths of 600, 900, and 1100 mm. Stock beams are available in sizes of 1.35 and 2.7 metres, capable of handling a safe working load of up to 3000 kg UDL per pair. For specialised requirements, frame sizes can extend up to 12.0 metres, and beam sizes can reach up to 3.9 metres.
The weight a racking system can bear is influenced by multiple factors, including the size and type of the racking chosen, as well as the capacity and condition of the floor slab where it’s installed. Of course, it is sometimes possible to reinforce an existing system to accommodate heavier loads, and this is something an experienced supplier can advise on. Calculating the expected weight, both current and future, is an indispensable part of any racking installation plan. Along with weight considerations, the maximum height for racking is determined by height, racking type, load capacity, and the reach of material handling equipment; most standard forklifts, for instance, can only reach 4 to 4.5 metres.
The Health and Safety Executive (HSE) provides extensive guidance on stacking heights to ensure safety.
Enhance Racking Utility with Accessories
A standard racking system effectively handles storage, but its utility and integrity can be significantly enhanced through various accessories, creating a truly customised storage solution.
You should also get advice from your racking installation company on the enhancements available for both usefulness and safety. Examples include:
- Anti-collapse mesh: Prevents accidents and limits stock damage, especially for pallet racking.
- Column guards and corner guards: Protect the racking structure from impact damage.
- Pallet support bars and fork spacers: Ensure correct and safe placement of pallets.
- Drum cradles and hanging garment rails: Offer specialised storage for specific item types.
- Guide rails: Direct handling equipment and protect racking.
- Location and load signage: Essential for clear identification, safety, and compliance.
- End barriers and dividers: Further compartmentalise and protect storage areas.
- Mesh partitioning: Creates safe walkways, separating personnel from forklift operation areas, enhancing safety and complying with Health and Safety legislation.
Efficient Installation: Precision and Safety in Practice
Once you’ve signed off on the final design, the next crucial step is efficient installation. The integrity and longevity of a racking system hinge entirely on the quality of its installation. Compromising on installation services can undermine the entire investment, leading to reduced working lifespans and increased risks of workplace accidents.
It goes without saying that, like any other successful project, the installation phase - the implementation of the design - relies solely on attention to detail.
A professional racking installation company will ensure that every bay and level is correctly assembled using appropriate base plates, floor fixings, anchors, and safety locks, all in strict adherence to FEM/SEMA design codes and guidelines.
Seemingly minor errors can threaten the strength and stability of an entire system. Drawing on extensive hands-on experience, a dedicated installation team will follow a tried and tested approach. One that consistently delivers optimal results.
For example, at USS, our team follows a meticulous process that covers every aspect from beginning to end:
- Pre-installation risk assessments: Identifying potential hazards and planning mitigation strategies.
- Comprehensive review of plans and drawings: Ensuring a complete understanding of design specifications.
- Careful assembly of all components: Including uprights, bracing, beams, and frames.
- Fitting back connectors: Where relevant, to enhance stability.
- Strategic addition of protective elements: Such as column protectors, guide rails, and anti-collapse meshing.
- Installation of loading notices: Properly spaced to ensure compliance with safety guidelines.
- Rigorous final safety checks: Before handover, guaranteeing a robust and secure system.
Although every project differs in some aspects, the actual installation should typically follow a structured sequence:
1. Space Analysis: Thorough analysis of available space, evaluating floor durability and stability, and existing equipment.
2. Method Establishment: Determining the safest and most efficient installation means, securing the system in line with SEMA regulations.
3. Frame Construction and Securing: Frames are constructed using vertical supports, braces, and base plates, securely fastened to the floor.
4. Beam Placement: Racking beams are slotted into designated positions and fastened appropriately for the racking type and load capacity.
5. Decking Installation: The final step involves installing decking, commonly from steel, wire mesh, or chipboard.
The Turnkey Advantage
Many racking fit-outs are often part of a broader project that also includes racking design and supply. The “turnkey service” approach is one that we favour, as do our clients: it means they benefit from our years of expertise and experience, all of which can be seamlessly applied across all project phases.
When installation, design and project management are provided as a single service, the result is a system precisely optimised for the space, designed to improve efficiency, and providing excellent value for money. And there are other advantages to an integrated approach: it minimises last-minute adjustments and changes - and ensures a well-built, properly fitted system designed for years of reliable performance. Expert installation teams bring extensive experience to complex projects across various environments, adapting processes to meet the specific needs of clients, ranging from major chains to independent warehouses and national distribution centres.
Ensuring Performance and Safety for Decades
A warehouse racking system is a significant asset, and its true value is realised through long-term optimisation, which ensures sustained performance, safety, and adaptability over many years, ideally decades. But it doesn’t just happen. It needs the application of proactive strategies for maintenance, protection, and the ability to reconfigure as needs change.
Adaptability and Reconfiguration
The operational landscape of a warehouse is rarely static. Businesses evolve, inventory types shift, and processes are refined. So, the ability to alter racking systems after installation is a critical feature; of course, it’s a much easier prospect if modular solutions are initially chosen.
Any alteration in use or layout - or both - must prioritise safety and remain within the system's design tolerances. Most well-designed systems are inherently flexible and can even accommodate fairly significant shifts in configuration. A long-term design philosophy extends to the choice of materials, layout prioritisation, and ongoing client support, ensuring racking systems support processes far into the future.
Protection and Maintenance
Racking systems are vulnerable to various forms of damage. Outdoor racking faces corrosion from environmental elements, while indoor racking is frequently subjected to impacts from material handling equipment, such as forklift trucks.
Preventative measures against damage are key:
- Corrosion Protection: Regular application of chemical protection treatments for outdoor racking.
- Physical Protection: Strategically placing guard rails and shock-absorbent barriers in busy warehouse environments to absorb impacts and shield the racking structure.
- General Maintenance: Consistent and regular inspection and maintenance routines are the most effective way to protect any warehouse racking system.
The Critical Role of Racking Inspections
Racking inspections are not merely a recommendation; they are a necessity and often a legal requirement. Inspections should be conducted regularly, with additional checks required after any collision with handling equipment. Health and Safety legislation typically mandates yearly expert inspections; however, more frequent checks are prudent in areas with heavy traffic. These inspections are vital for identifying wear and tear, damage, and potential safety issues before they escalate. Experienced, SEMA-approved inspectors or other technically competent persons conduct checks, providing a written report detailing necessary repairs, maintenance, or replacements to ensure ongoing compliance and safety.
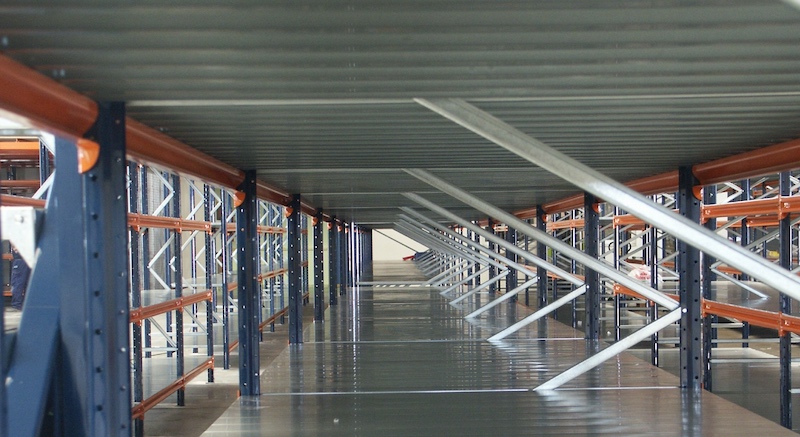
One Last Thing - Integrating with Mezzanine Floors
Although this article isn’t about mezzanine floors, we should mention these because a powerful strategy for long-term space optimisation is the integration of warehouse racking with mezzanine flooring.
It’s a combination that offers a highly effective way to instantly increase available floor space within a facility without building expansion, by capitalising on vertical space that would otherwise remain unused.
Once installed, a mezzanine floor can support additional racking systems or house facilities such as office spaces, reception areas, or other operational zones. By shifting to the mezzanine level, valuable ground-floor space is freed up, allowing for the extension of existing racking or the introduction of new systems.
Conclusion
The effective management of warehouse space is a complex and multifaceted challenge that demands high expertise.
A truly optimised warehouse racking system results from strategic design, efficient installation, and diligent long-term optimisation. Each of these pillars is interdependent, contributing to a robust, safe, and highly efficient storage environment. From initial detailed requirements gathering and the precise application of advanced design software, through meticulous, SEMA-compliant installation, and ongoing commitment to inspections, protection, and adaptability, every stage is critical.
By prioritising these aspects, businesses can transform their warehouses into dynamic assets that maximise capacity, streamline operations, ensure personnel safety, and guarantee the longevity of their investment for decades to come. The ultimate goal is a well-organised space capable of supporting continued growth, removing bottlenecks, and enhancing overall efficiency.
This blog is for information purposes only and should not be construed as legal or financial advice and not intended to be substituted as legal or financial advice.
Content Form

Follow Us


- Custom Fabrications
- Racking & Shelving
- Self-Storage Units